In this post, I am going to show you how to configure static routing in 2 routers on packet tracer and with that, I will also share you all the important static routing commands and its uses. Before that, let’s understand what does the static routing means.
What is Static Routing?
Static Route is the route that the network administrator manually enters into the routing table. It is a one-way communication and here we do not use any routing protocol.
How to configure static routing in 2 routers on packet tracer
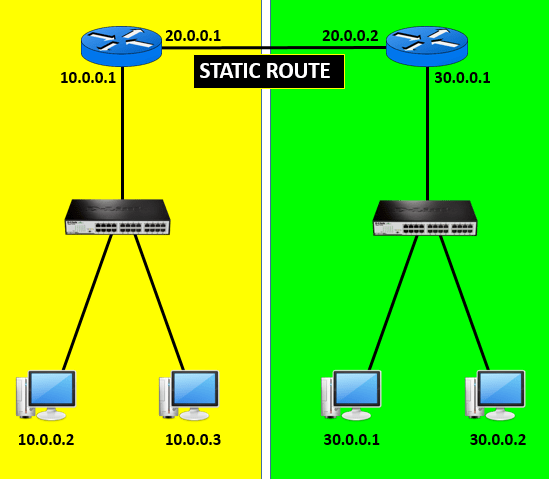
Let’s take an example,

The first step to configure static routing on a router is to add the IP Address to all required port of the router and assign the clock rate on the DCE side of the serial cable.
Add IP Address to the Router 1
Router>en (Enable Privilege Mode) Router#conf t (Enable Global Configuration Mode) Router(config)#int s0/0 (Selecting serial port s0/0) Router(config-if)#ip add 20.0.0.1 255.0.0.0 (Adding IP Address to the serial port s0/0) Router(config-if)#clock rate 64000 (Hence, the DCE side of the serial cable is connected to the Router 1. So we have to assign the clock rate here) Router(config-if)#no shut (Enable the serial port s0/0) Router(config-if)#int f0/0 (Selecting Fast Ethernet f0/0) Router(config-if)#ip add 10.0.0.1 255.0.0.0 (Adding IP Address to the Fast Ethernet port f0/0) Router(config-if)#no shut (Enable the Fast Ethernet port f0/0)
Add IP Address to the Router 2
Router>en (Enable Privilege Mode) Router#conf t (Enable Global Configuration Mode) Router(config)#int s0/0 (Selecting serial port s0/0) Router(config-if)#ip add 20.0.0.2 255.0.0.0 (Adding IP Address to the serial port s0/0) Router(config-if)#no shut (Enable the serial port s0/0) Router(config-if)#int f0/0 (Selecting Fast Ethernet f0/0) Router(config-if)#ip add 30.0.0.1 255.0.0.0 (Adding IP Address to the Fast Ethernet port f0/0) Router(config-if)#no shut (Enable the Fast Ethernet port f0/0) So, we have successfully added the IP Address on all the required ports of the router. Now, its time to configure the route.
How to configure static routing in 2 routers on packet tracer
The formula for creating a static route is IP Add Destination Network ID Subnet Mask Gateway Note: Network ID is the first IP Address of the networks and this address cannot be used in the host.
Configure Static Routing on Router 1
Router>en (Enable Privilege Mode) Router#conf t (Enable Global Configuration Mode) Router(config)# IP Route 30.0.0.0 255.0.0.0 20.0.0.2 (Here, 30.0.0.0 is the network ID of the 2nd Network) Router(config)#Exit
Configure Static Routing on Router 2
Router>en Router#conf t Router(config)# IP Route 10.0.0.0 255.0.0.0 20.0.0.1 (Here, 10.0.0.0 is the network ID of the 1st Network) Router(config)#Exit So, the static routing configuration is successfully done. Now add the IP address and the gateway to all the PCs available on both the networks. Configure IP Address on PC in Network 1 PC 1 IP Address: 10.0.0.2 Subnet Mask 255.0.0.0 Gateway: 10.0.0.1 PC 2 IP Address: 10.0.0.3 Subnet Mask 255.0.0.0 Gateway: 10.0.0.1 Configure IP Address on PC in Network 2 PC 1 IP Address: 30.0.0.2 Subnet Mask 255.0.0.0 Gateway: 30.0.0.1 PC 2 IP Address: 30.0.0.3 Subnet Mask 255.0.0.0 Gateway: 30.0.0.1 Now, try to ping between the PC in Network 1 and Network 2 it should ping. So, guys, this is all about how to configure static routing in 2 routers on packet tracer. Hope, you have enjoyed reading this article then please let us know your feedback in the comment section below.
How to Configure Static Routing in Packet Tracer Video Tutorial
Difference between Static Routing and Dynamic Routing
Difference between Static Routing and Dynamic Routing


