OSPF stands for Open Shortest Path Fast. It is a link state routing protocol used to handle routing for IP traffic. In this post, you are going to learn:
- How to configure OSPF in packet tracer
- OSPF Configuration Commands Step by Step
- OSPF Area Configuration
- OSPF Troubleshooting Commands
- Video Tutorial on how to configure OSPF in packet tracer.
How to configure OSPF in Packet Tracer

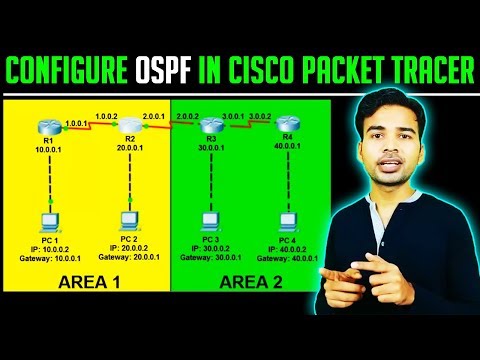
So, in this example, we are going to take four Routers where one PC is connected to each. Router 1 and Router 2 belong to Area 1 and Router 3 and Router 4 belong to Area 2. OSPF Area Configuration we are going to do while configuring the route. Now, let’s add IP Address on all the devices according to the picture given above.
Router 1 IP Configuration
Router>en
Router#conf t
Router(config)#int s0/0
Router(config-if)#ip add 1.0.0.1 255.0.0.0
Router(config-if)#clock rate 64000
Router(config-if)#no shut
Router(config-if)#int f0/0
Router(config-if)#ip add 10.0.0.1 255.0.0.0
Router(config-if)#no shut
Router 2 IP Configuration
Router>en
Router#conf t
Router(config)#int s0/0
Router(config-if)#ip add 1.0.0.2 255.0.0.0
Router(config-if)#no shut
Router>en
Router#conf t
Router(config)#int s0/1
Router(config-if)#ip add 2.0.0.1 255.0.0.0
Router(config-if)#clock rate 64000
Router(config-if)#no shut
Router(config-if)#int f0/0
Router(config-if)#ip add 20.0.0.1 255.0.0.0
Router(config-if)#no shut
Router 3 IP Configuration
Router>en
Router#conf t
Router(config)#int s0/0
Router(config-if)#ip add 2.0.0.2 255.0.0.0
Router(config-if)#no shut
Router>en
Router#conf t
Router(config)#int s0/1
Router(config-if)#ip add 3.0.0.1 255.0.0.0
Router(config-if)#clock rate 64000
Router(config-if)#no shut
Router(config-if)#int f0/0
Router(config-if)#ip add 30.0.0.1 255.0.0.0
Router(config-if)#no shut
Router 4 IP Configuration
Router>en
Router#conf t
Router(config)#int s0/0
Router(config-if)#ip add 3.0.0.2 255.0.0.0
Router(config-if)#no shut
Router(config-if)#int f0/0
Router(config-if)#ip add 40.0.0.1 255.0.0.0
Router(config-if)#no shut
So, this is how to add IP Address in Routers. Now add the IP Address and Gateway on PC according to the picture given above.
PC 1 IP Configuration
IP: 10.0.0.2
Subnet Mask: 255.0.0.0
Gateway: 10.0.0.1
PC 2 IP Configuration
IP: 20.0.0.2
Subnet Mask: 255.0.0.0
Gateway: 20.0.0.1
PC 3 IP Configuration
IP: 30.0.0.2
Subnet Mask: 255.0.0.0
Gateway: 30.0.0.1
PC 4 IP Configuration
IP: 40.0.0.2
Subnet Mask: 255.0.0.0
Gateway: 40.0.0.1
Now, its time to configure OSPF. Before that, let’s understand the uses of the OSPF commands.
OSPF Routing Commands
Router ospf 10
This command allows you enable OSPF protocol on your router and number 10 is the process ID. You can give the process ID between 1 to 65,535.
Network 1.0.0.0 0.255.255.255 area 1
This command allows you to create a route in OSPF. Where 1.0.0.0 is the Network ID to which the router is connected to.
0.255.255.255 is a Wildcard Mask which is the complete inverse of Subnet Mask. The best way to find the wildcard mask is, just subtract the subnet mask from 255.255.255.255. In this example, the default subnet mask for the class A IP address is 255.0.0.0. So we have subtracted it from 255.255.255.255 and got the wildcard mask as 0.255.255.255.
In the end, we have mentioned area 1. Here in OSPF, the area defines the complete different network. Two different Areas cannot communicate with each other directly. If you want them to allow communication than you have to create an additional route that we are going to discuss in our next post.
OSPF Configuration Commands Step by Step
Configure OSPF in Router 1
Router#
Router#conf t
Router(config)#router ospf 10
Router(config-router)#network 1.0.0.0 0.255.255.255 area 1
Router(config-router)#network 10.0.0.0 0.255.255.255 area 1
Router(config-router)#^Z (Use Ctrl + Z to save settings)
Configure OSPF in Router 2
Router#
Router#conf t
Router(config)#router ospf 10
Router(config-router)#network 1.0.0.0 0.255.255.255 area 1
Router(config-router)#network 2.0.0.0 0.255.255.255 area 1
Router(config-router)#network 20.0.0.0 0.255.255.255 area 1
Router(config-router)#^Z
Configure OSPF in Router 3
Router#
Router#conf t
Router(config)#router ospf 10
Router(config-router)#network 2.0.0.0 0.255.255.255 area 2
Router(config-router)#network 3.0.0.0 0.255.255.255 area 2
Router(config-router)#network 30.0.0.0 0.255.255.255 area 2
Router(config-router)#^Z
Configure OSPF in Router 4
Router#
Router#conf t
Router(config)#router ospf 10
Router(config-router)#network 3.0.0.0 0.255.255.255 area 2
Router(config-router)#network 40.0.0.0 0.255.255.255 area 2
Router(config-router)#^Z
So guys, we have successfully configured the route on all the four Routers. Now, try to ping from PC 1 to all the PCs connected with different routers. You must be able to ping with PC 2 because it is in the same Area i.e. Area 1 as PC 1. and If you ping PC 3 and PC 4, you will get Destination Host Unreachable error because it is on different Area i.e. Area 2.
OSPF Troubleshooting Commands
- Show IP Protocol: Tells you what protocol is configured in the router.
- Show IP Route: Tells you all the available route via which the packet will reach the destination and also the network your router is directly connected to.
- Show IP Route OSPF: Only display the best route according to OSPF.
- Show IP OSPF: Display basic information about OSPF.
- Show IP OSPF Interface: Display the current status of all the ports and their IP Address of a particular router.
- Show IP OSPF database: Displays the link connected to the router and the router IDs of the neighboring routers.
How to configure OSPF in packet tracer Video Tutorial